Fuel Advisor
Casual & aboveWind-aware, multi-stop fuel planning for cross-country flights — in seconds.
What Is It?
The Fuel Advisor is a cross-country planning tool that finds the best intermediate fuel stops for your aircraft when the distance exceeds your usable range. It isn't just a static airport finder — it fetches live wind forecasts along your route and picks stops that minimize total flight time, accounting for headwinds and tailwinds at your cruise altitude.
Once you confirm a route, the Fuel Advisor creates a full multi-leg trip in PlaneWX and immediately generates weather briefings for every leg — the same AI-powered briefings you get from any other PlaneWX trip.
Who Should Use It?
The Fuel Advisor is designed for pilots flying:
- Cross-country legs longer than their aircraft's practical range
- Aircraft with smaller tanks that require one or more fuel stops on longer routes
- International corridors where fuel availability must be planned ahead
- Any route where they want a departure fuel plan — even for direct flights
Getting Started
Access the Fuel Advisor from the Tools menu in the top navigation bar, then choose Fuel Advisor.
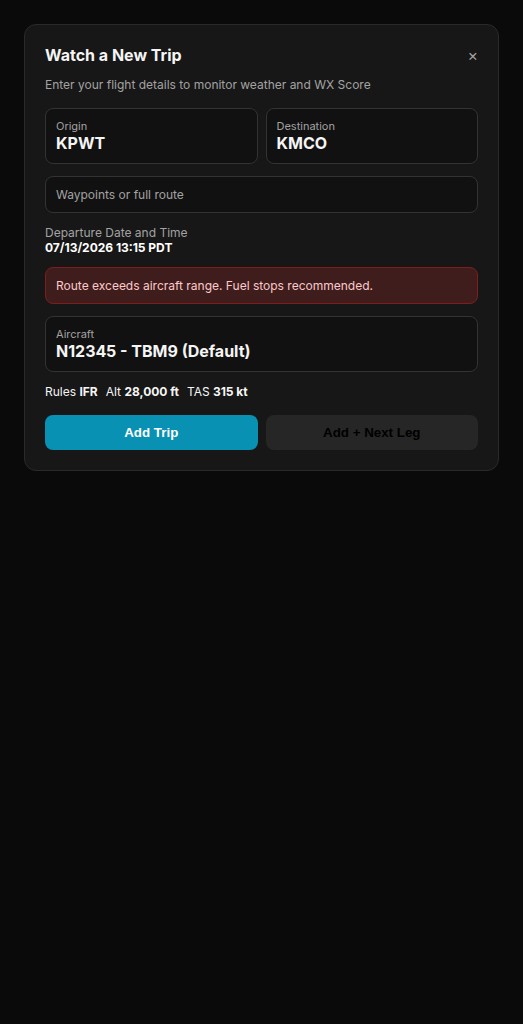
In the Watch a New Trip dialog, entering KPWT → KMCO in a TBM 9 (1,218 nm range with reserves) instantly surfaces a “Route exceeds aircraft range” banner with the trip distance, aircraft range, and a one-tap Find Fuel Stops button.
Clicking Find Fuel Stops opens the Fuel Advisor with your departure, destination, aircraft, and departure date/time already carried over from the trip form — nothing to retype. Plan your stops, confirm a route, and you're dropped right back into a fully-briefed multi-leg trip.
Pick up where you left off. The Fuel Advisor automatically remembers your route, aircraft, and filters between visits, so if you navigate away mid-plan, everything is waiting for you when you come back. See Saving & Reusing Plans below for details.
How to Plan a Fuel Stop Route
Enter Your Departure and Destination
Type the ICAO identifier for your origin and destination airports. If you arrived here via Find Fuel Stops from the trip form, or from the trip planner, these will already be pre-filled. Click the swap icon to reverse the route.
Choose an Aircraft
Select one of your saved aircraft profiles. The Fuel Advisor uses your aircraft's fuel capacity, reserve settings, cruise speed, and fuel type to calculate realistic range and fuel loads at each stop. Make sure your aircraft profile is up to date — especially fuel capacity and cruise fuel burn — for accurate results.
Set Departure Fuel, Max Fuel Load, and Fuel Loading
Enter Departure fuel (gallons or pounds at takeoff — not a ramp pump ticket). Optionally set Max Fuel Load from your W&B; leave it blank for full tanks capacity. Choose Full tanks or Minimum needed — typing Departure fuel defaults to Minimum needed so origin is not silently filled to Max. See Departure Fuel & Loading below.
Set a Departure Date and Time
Enter the date and local departure time. This matters: the wind forecast is pulled for the exact time each leg is expected to be flown. A morning departure will fetch different winds than an afternoon one.
Configure Airport Filters
Use the filter panel to tailor which airports appear as candidates. See the Airport Filters section below for full details.
Click Search
The Fuel Advisor runs in seconds. It fetches multi-model consensus winds along your route, evaluates hundreds of candidate airports, and returns the best route options sorted by total estimated flight time — shorter is better.
Review Routes and Choose One
Each suggested route shows the full sequence of stops, leg distances and estimated times, wind components (headwind/tailwind) for each leg, weather scores, and a fuel plan. Pick the route that works best for you.
Confirm and Create Trip
Click Confirm Route & Create Trip. A confirmation dialog lets you review departure times and ground times at each stop. Once confirmed, PlaneWX creates a linked trip group and immediately generates weather briefings for every leg.
Departure Fuel & Loading
Before you search, the Fuel Advisor form has three fuel controls. These match what you see on the tool — not a separate “how much to pump at the ramp” calculator.
Departure fuel
Max Fuel Load
Full tanks | Minimum needed
- Full tanks — fill toward Max at origin and at every stop.
- Minimum needed — if Departure fuel covers the first stop with reserve, plan $0 at origin. If not, add only the shortfall (N gal) at origin to make that stop — never a silent fill to Max. Later stops add only enough for the next leg + reserve, not a reset to Max.
Understanding the Fuel Plan
Each route shows a detailed fuel plan for every leg. Here's what each number means:
Departure Fuel (on each leg)
Estimated Burn
Landing Fuel (FOD)
Fuel to Add
Minimum Fuel to Add
Fuel Plan on Your Briefing
Once you've confirmed a route and briefings are generated, a Fuel Plan section appears directly on each briefing card — so your fuel numbers and weather analysis are always in the same place.
Collapsed Summary
Required FOB
W&B Max
International FBO Dual Display
Tip: Consider adding extra fuel if you anticipate deviation around storms or a destination alternate. The fuel plan shows a reminder: “Consider adding more if you expect storms at your destination or a possible divert.”
Wind Forecasts
Wind data uses the same multi-model consensus as briefing Winds Aloft (HRRR / HRDPS / ICON + GFS + ECMWF by region, via Open-Meteo), sampled at your cruise altitude at multiple points along each leg. The Fuel Advisor calculates the effective headwind or tailwind component for your track and adjusts estimated leg times accordingly.
Forecast Horizon
Leg-Specific Timing
The wind component shown for each leg is the along-track average for that leg — labeled as headwind (HW) or tailwind (TW). Internally, positive values are headwinds and negative values are tailwinds. Route options are sorted by total estimated flight time, so wind-efficient routes naturally bubble to the top.
Airport Filters
The filter panel gives you precise control over which airports are considered as fuel stop candidates. Filters are applied before any wind or range calculations.
Avoid Landing Fees
Require Instrument Approach
Require Towered Airport
Untowered Only
Avoid Class B
Avoid / Prefer Class C
Fuel Programs
Exclude Specific Airports
Avoid Training-Heavy Airports
Reset Filters: A Reset button appears in the filter panel whenever any setting differs from the default. Click it to restore all filters to their defaults in one step.
Leg Length Preferences
The Leg Length setting controls how the Fuel Advisor segments the route:
Max Range (default)
Fly as far as possible on each leg, stopping only when range requires it. Minimizes total stops and ground time.
Max Hours Per Leg
Cap each leg to a maximum number of flight hours. Useful for managing fatigue on long travel days or for aircraft where extended range missions are uncomfortable.
Max Distance Per Leg
Cap each leg to a maximum nautical mile distance. Helpful when you know the airspace or terrain on certain segments and prefer shorter hops.
A minimum leg time (default 30 minutes) ensures that very short legs aren't suggested — stops too close together add more ground time than they save.
Reading the Results
Each route card shows:
- •Route overview — departure → all stops → destination with distance and ETE for each leg
- •Wind component — headwind (HW) or tailwind (TW) in knots for each leg, based on your cruise altitude and expected departure time
- •Weather score. A quick Favorable / Marginal / Unfavorable indicator for each leg so you can immediately spot a challenging segment
- •Fuel plan — departure fuel, estimated burn, landing fuel, and fuel to add at each stop
- •Stop details — airport name, identifier, class, and any fuel program participation
- •Interactive map — the full route plotted on a moving map so you can visually evaluate the path
Routes are ranked by total estimated flight time. The first option is typically the most efficient. If you see fewer options than expected, check whether any active filters are eliminating candidate airports — the filter hint will tell you.
Direct Flights (No Stops Needed)
If your aircraft has enough range to fly direct — even with full reserves — the Fuel Advisor will tell you that no fuel stop is needed and show you a departure fuel plan for the direct flight. This includes:
- How much fuel to depart with
- Estimated fuel burn for the trip
- Estimated landing fuel above reserve
- Wind component and estimated flight time based on current forecasts
You can still create a trip from a direct-flight result to get a full PlaneWX weather briefing.
After Confirming Your Route
When you click Confirm Route & Create Trip, here's what happens:
Review and adjust times
A confirmation dialog shows each leg with its planned departure time and ground time at each stop. Adjust any leg's ground time if you need more time for customs, fuel, or a quick bite.
Trips are created immediately
PlaneWX creates a linked trip group with one trip card per leg — just like a multi-city trip, fully linked together.
Briefings generate in parallel
Weather briefings for all legs are dispatched immediately. You'll land on the first leg's briefing while the others generate in the background — typically within 30–60 seconds.
Fuel plan appears in each briefing
The fuel plan for each leg (departure fuel, burn, landing fuel, fuel to add) is embedded directly in the briefing card so you have it at a glance during preflight.
Forcing Specific Fuel Stops
Need to stop at a particular airport — to visit someone, clear customs, or because you know the fuel is cheap there? Use the Planned Stops feature to pin one or more intermediate airports into the route. The Fuel Advisor will route through your pinned stop(s) and find the best candidates for any remaining gaps.
You can also set a maximum fuel load at a planned stop — useful if you know the fuel price is high there and you only want to take on enough to reach the next stop.
Saving & Reusing Plans
Setting up a route with the right aircraft, filters, and planned stops takes a bit of work — the Fuel Advisor saves that work for you two ways, so you're never starting from a blank form.
Autosave (automatic)
Save Plan As... (named plans)
My Plans (reload a saved plan)
What isn't saved: Your Departure fuel and departure date/time are always left blank to fill in fresh. These are specific to a single flight, not the plan itself — reusing a stale takeoff quantity or an old date could give you misleading numbers.
Aircraft Profile Requirements
The Fuel Advisor pulls the following from your aircraft profile. Make sure these are accurate for reliable results:
Fuel Capacity & Unit
Cruise Fuel Flow
True Airspeed (TAS)
Fuel Reserve Setting
Fuel Type (Avgas / Jet-A / Mogas)
If your aircraft profile is incomplete, the Fuel Advisor will prompt you to go to your aircraft settings and fill in the missing values before it can calculate a route.
Example: KCXO to KSAN
Sarah is flying her TBM 960 from Conroe, TX (KCXO) to San Diego (KSAN) — approximately 1,200 nm, which exceeds her comfortable non-stop range with reserves.
She opens the Fuel Advisor, enters KCXO → KSAN, selects her TBM profile, and sets a Thursday morning departure. She leaves Avoid Landing Fees on and Require Instrument Approach auto-enables since her aircraft is IFR-equipped.
The Fuel Advisor returns three routes in under 5 seconds. The top option routes through KELP (El Paso, TX) with a strong tailwind on the westbound leg — 45 minutes faster than the next alternative which stops at KABQ (Albuquerque). The briefing scores for both stops are green.
Sarah selects the KELP route. The fuel plan shows she needs to depart KCXO with 246 gal, add 180 gal at KELP, and will land at KSAN with 82 gal above her 45-minute reserve. She clicks Confirm, and all three briefings (KCXO→KELP, KELP→KSAN) are generated within a minute.
Tips for Best Results
- • Keep your aircraft profile current — accurate fuel capacity and GPH numbers directly affect how useful the fuel plan is
- • Enter Departure fuel (gallons at takeoff) so first-leg range and any origin shortfall (add N, not a silent fill to Max) match what you will actually fly
- • If you see fewer route options than expected, try turning off Avoid Landing Fees — it's the filter that most often limits candidates in dense corridors
- • Wind forecasts beyond 5 days carry more uncertainty — treat fuel burn estimates as approximate when planning far in advance; refine closer to your departure date
- • Use Planned Stops if you need to route through a specific airport for operational, personal, or customs reasons
- • Fly the same route often? Save it as a named plan so you can reload the whole setup in one click next time
- • Each generated briefing shows the fuel plan for that leg — review it during preflight alongside the weather analysis
- • After creating a Fuel Advisor trip, you can edit individual leg times or departure airports just like any other PlaneWX trip
Fuel planning is your responsibility. The Fuel Advisor provides estimates based on your aircraft profile data and weather model forecasts. Actual fuel burn varies with winds, power settings, weight, density altitude, and other factors. Always verify fuel loads and runway-alternate requirements against your aircraft's POH, applicable regulations, and your own judgment before flight.
PlaneWX fuel calculations are a planning aid — the pilot in command is always responsible for ensuring adequate fuel.